Tuesday, 21 December 2010

Odaiba - Tokyo

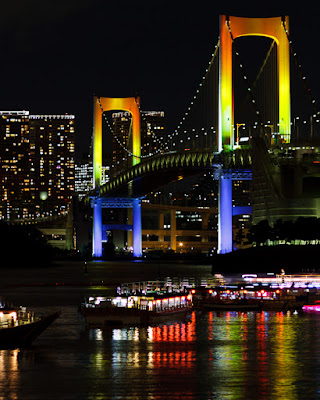
The other day I was running errands in the neighbourhood of Odaiba. It's located across the bay from downtown Tokyo. After finishing my errands I took the opportunity to take a few photos of this area. It's main photographic attraction is the view of Rainbow Bridge which gets it's name from the coloured lights used to illuminate the bridge at night.

This area is a popular spot for Tokyoites to visit with a number of waterfront restaurants offering stunning views of Rainbow Bridge and the Tokyo skyline. After dark it's also visited by numerous restaurant boats offering an alternative viewing location. This spot's also quite popular with photographers much like myself. While I was there I met several other tripod toting photographers with a bag full of lenses.
 
Here are a few shots...
 
Odaiba Waterfront
 Canon EOS 7D with a Canon EF-s 10-22mm f/3.5-4.5 USM at 35mm EFL
2 sec, f/4.5 & ISO 100 with tripod, MLU & remote release
A panoramic view of Tokyo bay from Odaiba with restaurant boats and Rainbow Bridge in the background.


Bridge & Boats
 Canon EOS 7D with a Canon EF 85mm f/1.8 USM at 136mm EFL
0.4 sec, f/2.8 & ISO 100 with tripod, MLU & remote release
A tighter shot of the bridge with a few colourful restaurant boats in the foreground.


Restaurant Boat
Canon EOS 7D with a Canon EF 85mm f/1.8 USM at 136mm EFL
0.4 sec, f/2.8 & ISO 100 with tripod, MLU & remote release
One of the many restaurant boats that frequent this area after the sun goes down.


The Bridge
 Canon EOS 7D with a Canon EF 85mm f/1.8 USM at 136mm EFL
2.5 sec, f/8 & ISO 100 with tripod, MLU & remote release
Rainbow Bridge which crosses Tokyo bay linking Tokyo and Odaiba.


Sleeping Seagulls
 Canon EOS 7D with a Canon EF 85mm f/1.8 USM at 136mm EFL
1.0 sec, f/8 & ISO 800 with tripod, MLU & remote release
I don't know how it is that so many seagulls try to sleep with so much light around but they do.

Wednesday, 8 December 2010

Before and After

Here is one of my very first images taken with a digital compact camera back in 2003. At that time I was given a film SLR camera but I alos bought a digital camera so I could experiment and practice composition, and not have to worry about film development costs. Once I found a good composition, I would then switch to the SLR to capture that high quality shot. However after a few months using the digital camera, I abandoned using the SLR. I seldom found good compositions so I stopped carrying it around and focused solely on improving my composition and technique.

For a long time I've looked at this image, wondering how I could have made it better and for a long time, I couldn't think of anything. However 8 years later, I've come to a point in my development as a photographer where I can now look at this image and see faults I couldn't before. Here is the unadjusted image straight from the camera. A lucky shot for a beginner.

Original Capture
Canon PowerShot S30 at 40mm EFL, tripod mounted.
1/15s at f/4.5

 When I look at this image these days, I get an overwhelming sense of red, especially in the shadows and the sky just above the buildings. To fix this using Lightroom, I used the white balance tool and looked for an area in the image where it should be almost black but there's a little red, and made a selection. I chose a place just above the buildings on the right hand side. The software makes a calculation and adjusts the colours in the image so that my selection is neutral grey. In this case Lightroom adjusted temp by -44 (it was a .jpg file) and tint by -5. Now my blacks actually look black and the colours in the water separate more, making them stronger too.

I also straightened the horizon, cloned out a few stars (noise or dust) in the sky and gave it a little extra saturation (+10). However they are minor adjustments. Removing the colour cast had the biggest impact on the final image.
After Post Processing
The colour cast is gone allowing the other colours to separate and become stronger.

Some people have also commented to me that they would like to see a more panoramic crop to remove the foreground. So here is a 2:1 crop. I'm quite partial to panoramic images but I kind of like the foreground as an anchor for the viewer. If I was to shoot this again, I would use a much wider lens and keep the foreground but add some more of the city on the left and right.


Alternative 2:1 Panoramic Crop
It's a nice city shot but I'm not sure I like loosing the foreground.


Tuesday, 7 December 2010

Birds In Flight

Well, I've had the Canon EF 400mm f/5.6L USM for a couple of months now. I added this lens to my collection for it's stellar reputation and performance at capturing birds in flight. I still have a lot to learn about this genre of photography but so far it's been quite exciting. My subjects are just a few common seagulls but since they are mostly white, they present a significant exposure challenge and therefore make great practice subjects.

To freeze birds in flight, I need to use a fast shutter speed. Around 1/1000s or more is a good start and since this lens is a rather slow f/5.6, it will need a lot of light to achieve this, without having to resort to increasing ISO. So to get the most out of a session, I usually only go out on a sunny day and try to find a location along the edge of a pond where the sun is more or less behind me so I can make the most out of available light.

I usually shoot birds in flight in manual mode. As a base line, I start with the camera settings at 1/1250s, f/5.6 and ISO 100. Once I've found my position with good light, I take a few test shots and adjust the settings as necessary. If shots are a little underexposed, I'll increase the ISO. If they are a little overexposed, I'll increase the shutter speed or I can get a little more depth of field. Over the course of a session, I periodically check exposures and make some adjustments if necessary. I find using manual gets me a higher percentage of correctly exposed images than relying on the camera's light meter.

For this kind of photography, I like to use a Canon EOS 7D with it's high frame rate and flexible AF system. I typically set AF Mode to AI Servo and Drive Mode to high speed continuous. I usually shoot in AF expansion mode but sometimes when the background is mostly sky, I switch to Auto Selection 19 point mode. The other three modes are disabled so it's easier to switch between these two modes. I also assign the multi-controller to AF point direct selection so it's very quick to change the active focus points.

Here's a few of my better shots so far. I love the detail this lens can capture in the flight feathers.


On Final
Canon EOS 7D with a Canon EF 400mm f/5.6 L USM at 640mm EFL.
1/1250s, f/5.6 & ISO 160.


Right Turn
Canon EOS 7D with a Canon EF 400mm f/5.6 L USM at 640mm EFL.
1/1250s, f/5.6 & ISO 320


Touch Down
Canon EOS 7D with a Canon EF 400mm f/5.6 L USM at 640mm EFL.
1/1250s, f/5.6 & ISO 320


Coming in Hard
Canon EOS 7D with a Canon EF 400mm f/5.6 L USM at 640mm EFL.
1/1250s, f/5.6 & ISO 320

  
Follow the Leader
Canon EOS 7D with a Canon EF 400mm f/5.6 L USM at 640mm EFL.
1/1250s, f/5.6 & ISO 160


One of the problems I've found so far with this lens is that the fixed focal length makes it hard to frame subjects. It's all to easy to clip a wing, especially when they are getting close to the camera.


steve

Wednesday, 1 December 2010

Praying Mantis

The other day, I was watching a video critique by Craig Tanner from The Mindful Eye. In this video among other things he was looking at the combination of colours and noted that while the image had the potential for a variety of colour pairs and triads, there was an overriding colour of green to the image. I had to agree. I didn't really like the colours in the image at all, too much green. However after he removed the colour cast, green was much less dominant, allowing all the colours to separate and greatly boost colour contrast. It was a subtle change but had a big impact on the final image.

A few days later and I find myself looking at this image below. I liked the pose from this praying mantis as he goes about cleaning his raptorial legs, but it didn't really separate well from the background. While I was staring at the image, I started to realise that there was an overriding sense of orange. Remembering Craig's video, I wondered if I removed this orange cast, would it allow my subject to separate from the background.

Praying Mantis – with orange colour cast

Canon EOS 7D with a Canon EF 100mm f/2.8 USM Macro lens at 160mm EFL hand held with twin off camera flashes remotely triggered. Exposure Trio: 1/250s, f/8 and ISO 100.

I use Lightroom to develop all my images. If you look closely at the top right corner, you'll notice that this area is almost neutral grey but there is a little orange in there. Using lightroom's white balance selector tool, I clicked on an area that was almost neutral grey in there, but still had a little orange cast to it.

Here is the result. The change is subtle but I think the orange is no longer so dominant, allowing the colours to separate and show the subject more clearly. In this case, Lightroom decreased the Colour Temperature from 5750k to 4950k and changed the Tint from +23 to +19.

Praying Mantis – without colour cast


This image was originally taken indoors with off camera flash and since my walls aren't pure white, the camera's auto white balance feature probably struggled to find a good value. When shooting macro with flash, I use Manual Exposure mode. I set my shutter speed to the fastest flash sync speed (1/250 for a 7D) and ISO at 100. Then I vary my aperture depending on how much depth of field I would like. The flashes combined with ETTL will fire just enough light to expose the image correctly. Ambient light will expose the background and if it's relatively dark, then it will underexpose or just stay black. Some people don't like this but I don't mind the effect.